At the University of Illinois in early 1980, I was in my senior year of EE/Bioengineering. Besides having some programming and basic computer engineering courses, one of my part-time jobs was at the computer center where I got to know a lot of hard-core computer types, and also got access to the mainframes and other facilities. Clearly, computers would be an important part of my carreer.
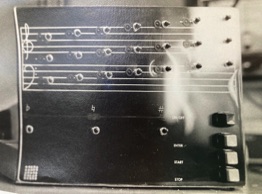
A roommate connected me with a young woman named Marcia who was working on a project in Industiral Design, which was under the auscpices of the art department. She had a small grant from a company to design a product. Her focus was on the packaging and at a certain level the functionality. The product was a musical pitch trainer. The idea is to give a musician instant feedback as to whether they were exactly on pitch for any given note. She sketched up what the thing would look like, including a grand staff on the front panel that would light up to show the pitch that the device "heard", and also an indication of how far off-pitch the player was.
My job was to design and fabricate the electronics. Since I had been building electronic stuff since early high school, the electro-mechanical part was down my alley. But building an embedded controller was very new to me. At that time, not many guys had scratch-built a computer of any kind.
Interface Circuitry
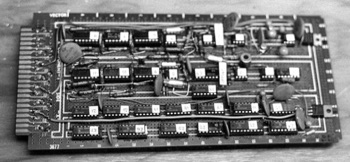
Being an already-experience analog guy, the interface part was the most fun. You have to interface any computer with the outside world. It's much easier now but at that time, it all had to be done by scratch. I designed a complicated board that consisted of a mic preamp, a tunable bandpass filter, and a frequency counter. It was fabricated on a Vector prototyping board with all the parts soldered to pads. I still use this method today.
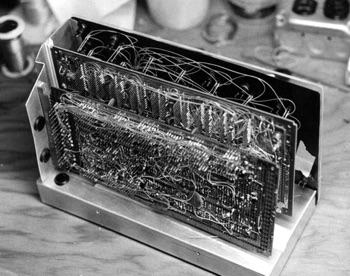
Building an Embedded Microcontroler
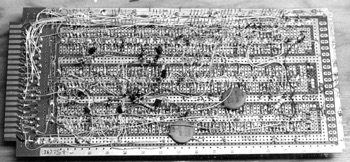
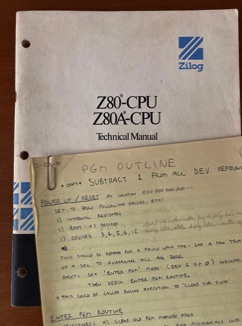
I had to take advantage of what was available at the time, including programming tools. A Zilog Z80 8-bit microprocess was locally available, along with the needed memory and other support chips. These were loaded onto a large S100 Bus prototyping board and connected via wire wrap. There were 31 ICs plus some other components on that board. The CPU had 16k of EPROM and 4k of RAM. I also designed in some debugging features, like a single-steper, so that I could execute one instruction at a time while looking at the various I/O bits.
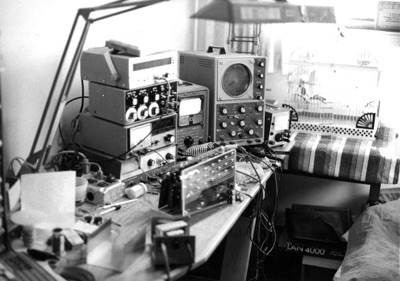
Debugging was a huge challenge. Today, there are fancy in-circuit emulators, interactive development systems, and all sorts of fancy tools that make the job much easier. All I had was a vacuum tube voltmeter (VTVM) and a 5 MHz AC-coupled Heathkit oscilloscope. I did get to take it to the computer center and use their fancy Tektronix 7000 osciloscope a couple of times and that was a real help.
Basically, I would execute a very simple test program that exercised only a single specific I/O element, and focut on that until I got it working. That way, all the hardware was tested one block at a time before trying to use it with a comprehensive program. Below is a photo of my bench in my apartment bedroom. I built it into the closet! A year later, I moved to California and replicated this in my spare bedroom. That's my parakeet in his cage in the background. He stayed with me through it all.
Programming
Programming a small computer and getting the code "burned" in EPROM was a challenge, but thanfully the computer center had solutions. First, there was a compiler for PL/M on the IBM System/360. I had taken a class that include PL/1, and this was a downsized version of that. It generated what are called Intel Hex files, which can be dowloaded into an EPROM programming station, which the computer center had. Turnaround time was a bit long: Edit program, compile, run over to the EPROM station, download and burn, then go back home.
The main application programming was actually done by my incredibly brilliant roommate, Stan King. Stan finished his masters in CS by the time he was 19, then went to work for NSA if that tells you anything. I supplied him with clear documentation and also pseudo-code for how the program should work. He really appreciated that, and used all his tricks to make it fit in the small available memory. The program is 299 lines including comments and empty lines.
Final Product
I fabricated a sheet metal chassis to hold the boards, and made the basic front panel to which Marcia then applied all the artwork. She enjoyed looking at catalogs to find the best-looking buttons and things too. The power supply was external, almost like today's wall-warts. Marcia hauled if off one day and with little time to spare, she fabricated the rest of packaing. Sadly, I never did get to see that and I have no idea what happened to the whole thing. Luckilly I took all these photos with my trusty Ricoh XR-S.
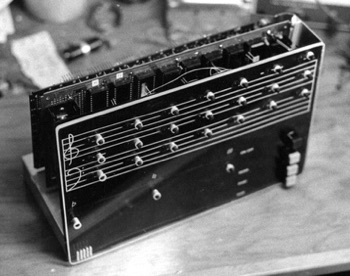
Heck yeah, it worked. We tried a number of different instruments and they all worked well enough. Of course, it couldn't handle chords... wasn't meant to! To use it, the musician presses a button next to the note they want to play. A horizontal row of LEDs below the staff then indicates the relative pitch error. This predates modern electronic tuners that everyone uses now. I suppose we actually invented something, but didn't realize there would be a market, nor did we have any idea how it might be turned into a real product.
This was a fantastic exercise for me and the experience was put directly to work at LLNL in the ensuing years. I also must say that the courses I had at UofI leading up to this were extremely helpful.
So, Did it Work?